You haven't signed in yet, you can have a better experience after signing in
*Please complete the payment within {{receiveCouponInfo.expire_at}}Previous use*
You haven't signed in yet, you can have a better experience after signing in
 Install4j Java Installer Builder Tool Software
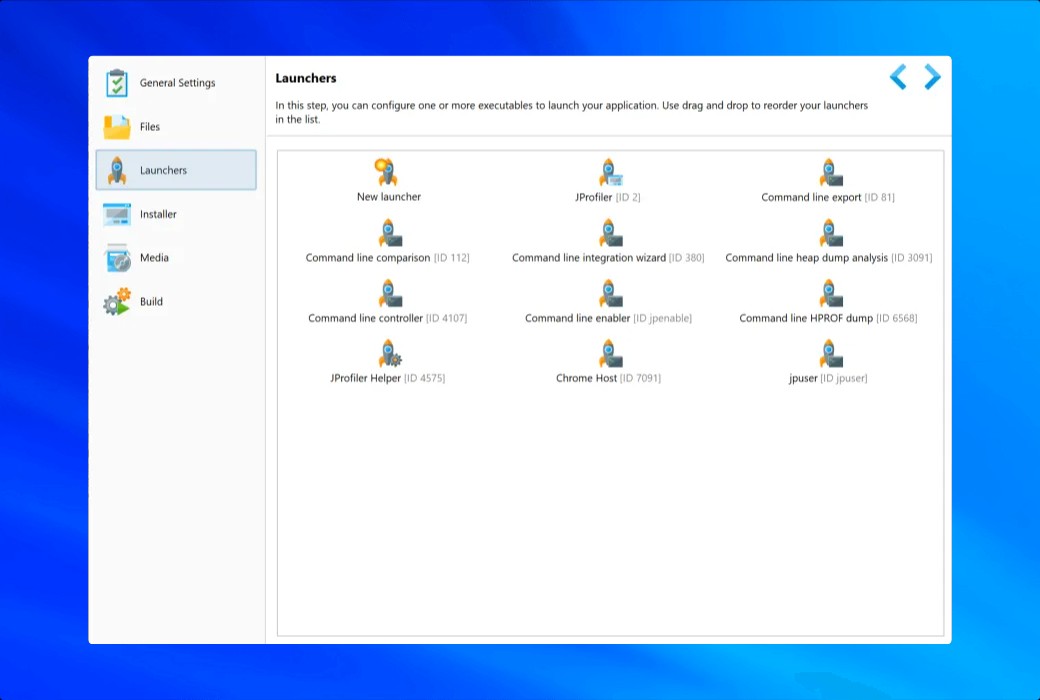
Activity Rules
1、Activity time:{{ info.groupon.start_at }} ~ {{ info.groupon.end_at }}。
1、Activity time:cease when sold out。
2、Validity period of the Group Buying:{{ info.groupon.expire_days * 24 }} hours。
3、Number of Group Buying:{{ info.groupon.need_count }}x。
Please Pay Attention
1、Teamwork process: Join/initiate a Group Buying and make a successful payment - Within the validity period, the number of team members meets the activity requirements - Group Buying succeeded!
2、If the number of participants cannot be met within the valid period, the group will fail, and the paid amount will be refunded in the original way.
3、The number of people required and the time of the event may vary among different products. Please pay attention to the rules of the event.
Install4j - A Powerful Multi Platform Java Installer Builder
Why choose install4j?
Features and characteristics
Official Website:https://www.ej-technologies.com/install4j
Download Center:https://install4j.apsgo.cn
Shipping Time: 24 hours manual processing for shipping
Operating Platforms: Windows, macOS, Linux
Interface Language: Supports English language.
Update Instructions: Varies depending on the purchased version.
Trial Before Purchase: Free trial available before purchase.
How to Receive the Product: After purchase, the activation information will be sent to the email used for placing the order. Additionally, the corresponding product activation code can be viewed in the personal center, under "My Orders".
Number of Devices: Varies depending on the purchased version.
Changing Computers: Uninstall on the original computer and activate on the new one.
Activation Guide: To be added.
Special Instructions: To be added.
References:https://www.ej-technologies.com/install4j

Any question

First trial experience of install4j
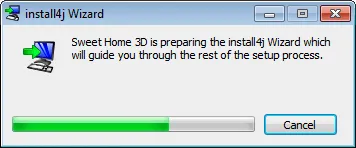
On December 14, 2010, Emmanuel released this tutorial aimed at introducing beginners to the usage of install4j. This tutorial demonstrates the various features of install4j 5.0 by step-by-step configuring an installation program called Sweet Home 3D (a free and open-source Java program). At present, Sweet Home 3D 3.0 version can be installed through Java Web Start or its built-in installation program (based on Inno Setup and launch4j tools), but install4j can build more powerful installation programs and Java launchers.
Download and install install4j
You can download install4j from the official website of ej technologies. If you want to try it out before purchasing a license, you need to fill out a form to obtain an evaluation key. Install4j supports multiple operating systems, and each operating system has two versions depending on whether you have installed JRE 6. In the download matrix, I selected the installation program for 64 bit Windows (21 MB) and double-click the downloaded installation icon to install it.
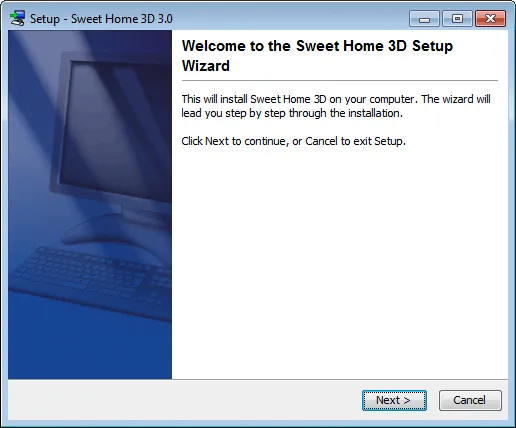
The installation process itself also demonstrates the capabilities of install4j, as the installation program is built using install4j. After the installation program started, it prompted me that I did not have a 64 bit JRE installed, but I only had a 32-bit JRE, so I clicked "Download" to obtain the 64 bit JRE. The next 10 steps, from license agreement and installation directory selection to license key input and automatic configuration update, are similar to other installation programs.
Start install4j
At first startup, Windows Firewall will ask if you allow install4j to use the network to check license keys, and you need to accept to ensure that all features of install4j are working properly. Subsequently, the main interface of install4j appeared, displaying various functions for creating installation programs.
Next, I will attempt to create the first version of the installation program and launcher for Sweet Home 3D.
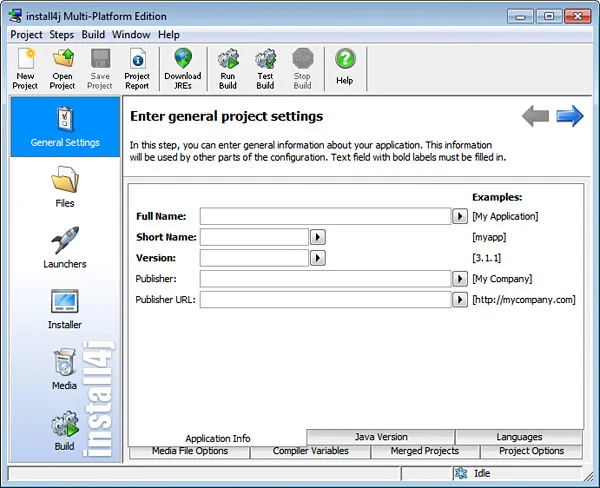
general setting
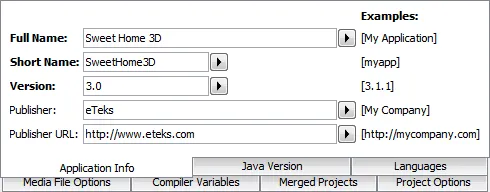
Firstly, I filled in the software name and version number in the "Application Information" tab.
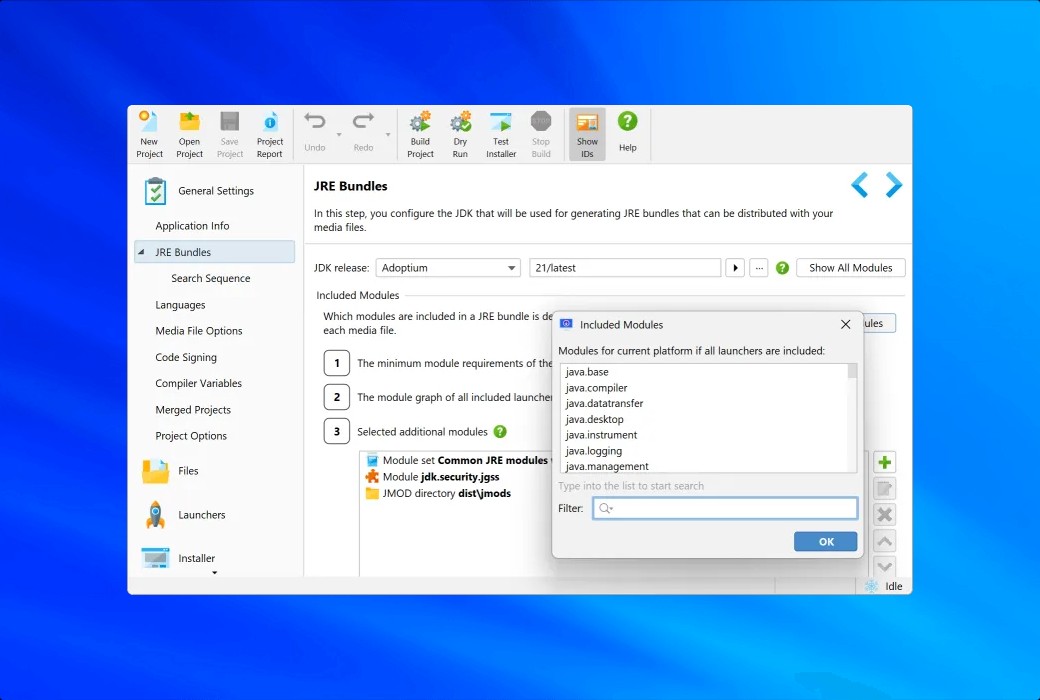
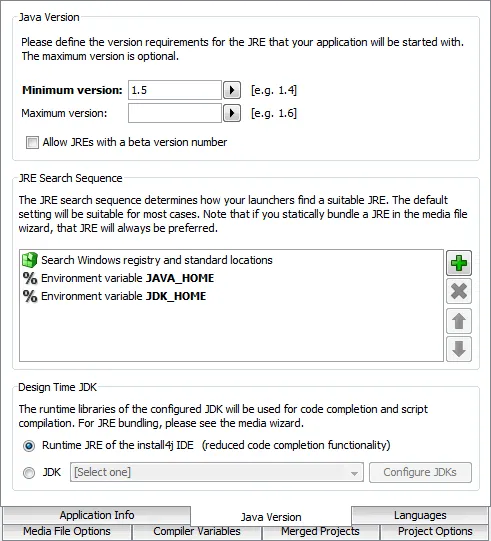
Then, in the "Java Version" tab, I require a minimum Java version of 1.5.
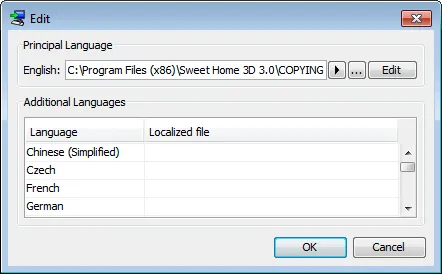
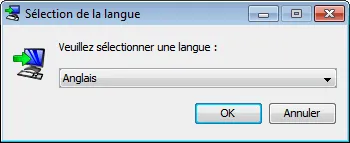
In the "Language" tab, I kept English as the primary language and added all languages supported by Sweet Home 3D (except for Bulgarian and Vietnamese).

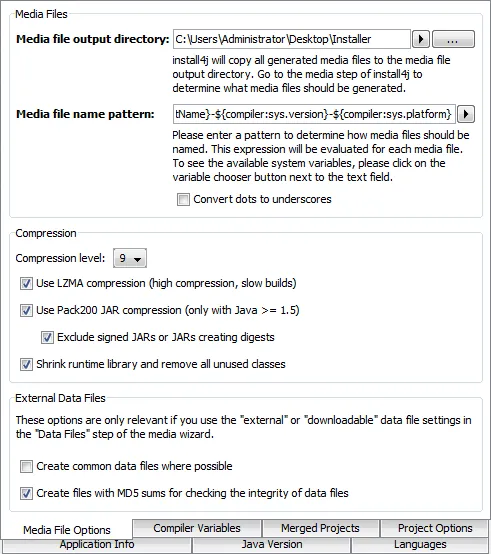
In the 'Media File Options', I selected the desktop installation program directory as the output directory, changed the name pattern to' {compiler: sys. sortName} - {compiler: sys. version} - {compiler: sys. platform} ', and unchecked the' Convert dots to underscores' option. This name pattern will resolve to the name of the Windows installation program based on the variable. Due to the current release of Sweet Home 3D being around 30 MB, I chose the smallest release and increased the compression level to 9 while selecting all compression options.
After completing the general settings, I will save the installation program project in the installation program directory on the desktop.
document
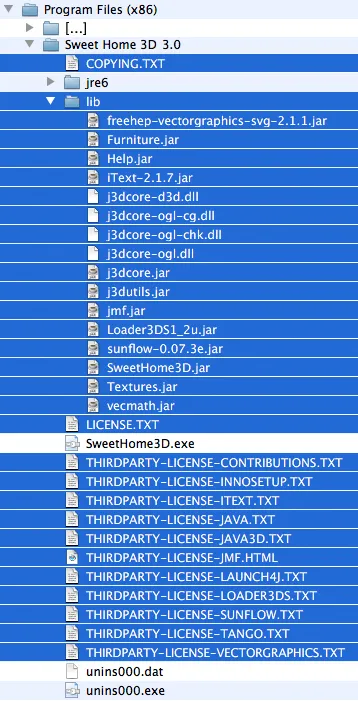
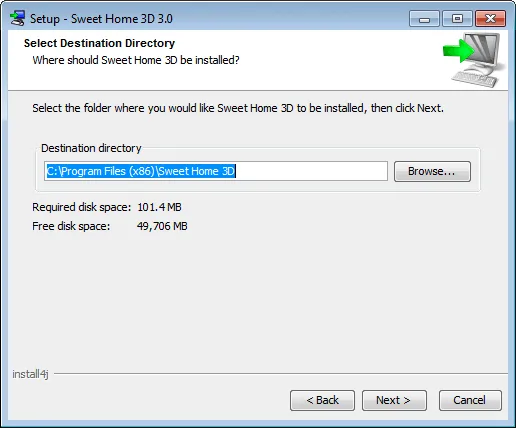
Next, I will click on it“document”Use icons to select files to be included in the distribution. These files can be assembled by calling the corresponding Ant targets in the build. xml file of the Sweet Home 3D project, but this tutorial does not involve Ant, so I choose to use the files installed by the existing installation program. I run the program and install the files into the C: \ Program Files (x86) \ Week Home 3D 3.0 directory.
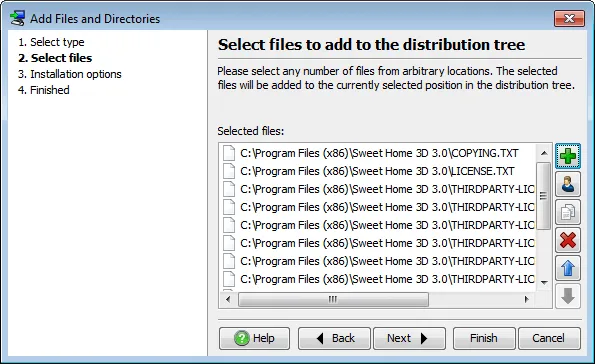
After installation, I need to include the jar file and license file in the distribution tree of install4j. These files are displayed in blue in the following list:
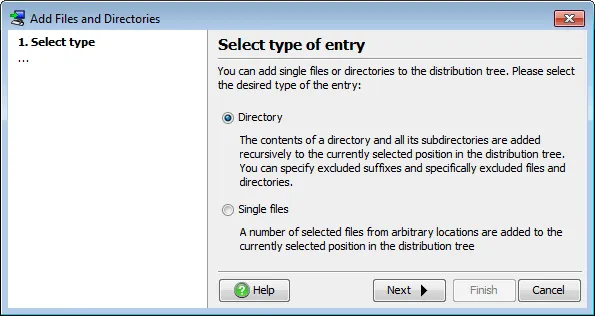
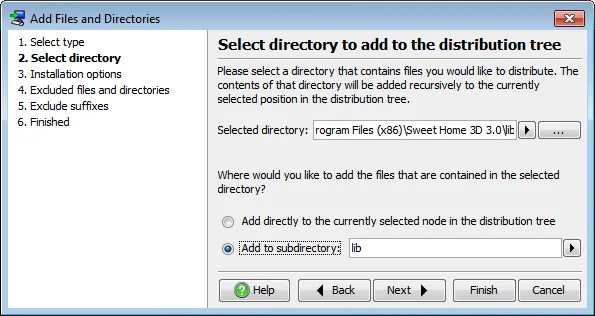
I click“insert”Button (green plus button), select the "Add Files and directories" option,
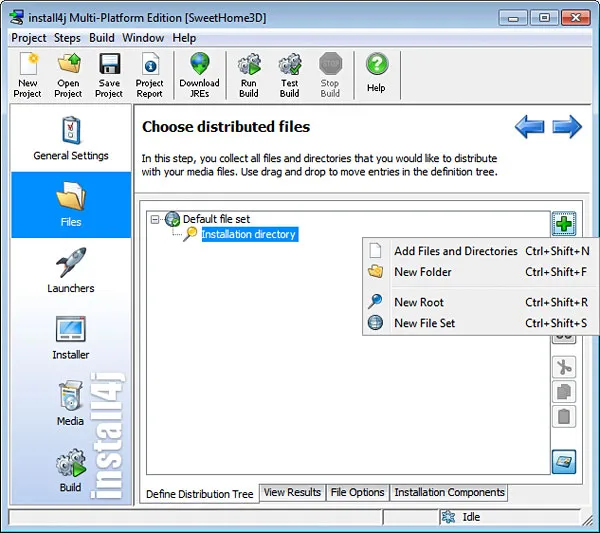
Then select the C: \ Program Files (x86) \ Week Home 3D 3.0 \ lib directory as the directory entry type, and check the "Add to Subdirectory" option. For license files, I choose the 'single file' type.
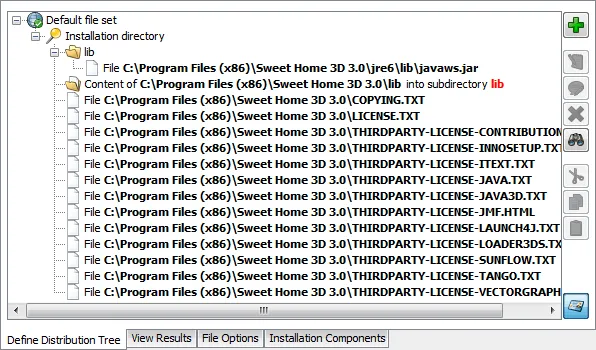
I also need to include the java ws. jar file located in the jre6 \ lib subdirectories, as Sweet Home 3D requires it to run. I inserted it as a 'single file' type and created a new folder called 'lib'. I dragged and dropped the JavaWS. jar file into it, making it appear in the lib subdirectories along with other jar files. All these files and directories ultimately appear in the list of the "Define Distribution Tree" tab.
launcher
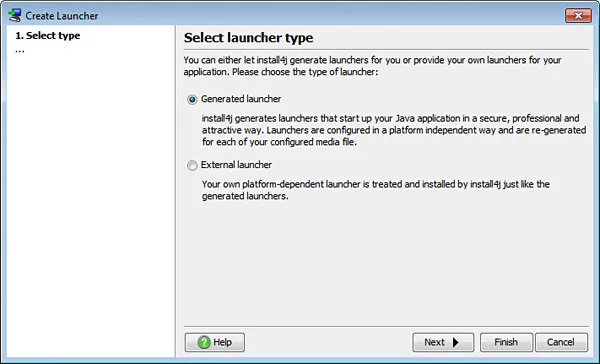
Since I do not need to set any file options and do not intend to provide optional files, I clicked“launcher”Icon, then double-click“New Starter "Icon.

This will launch a wizard for creating a launcher. I keep it“Generate launcher”Options for testing the functionality of install4j.
Next, I enter the application name and the directory it should appear in. In 'Ke'Execute file information”In the second step, there is also an interesting option that allows only one running instance. If I have not programmed this feature in Sweet Home 3D, I will select it.
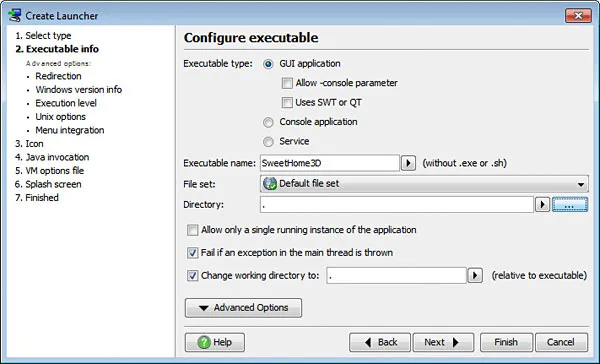
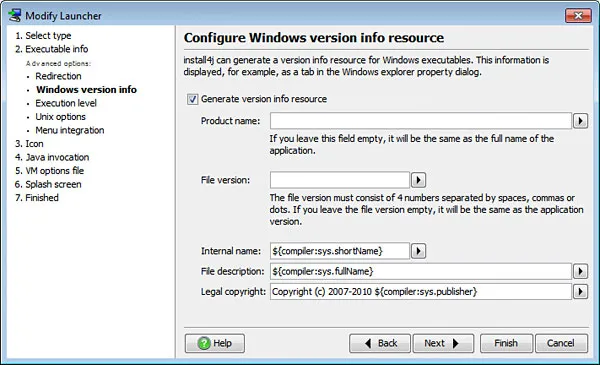
In“Advanced Options”In the list, I choose“Windows version information”, and select“Generate version information resources”Options to display the correct values in future launcher file properties dialog boxes. I asked install4j to replace the "Product Name" and "File Version" fields and“Internal Name”The“file description”And“Copyright Information”Enter values in text fields using some existing variables.
In“icon”In the third step, I choose“Add icon to launcher”Options and in“Cross platform image files”Three different sizes of icons are configured for the program in the list.

“Java Call”The steps display the information required to run a Java application. atVirtual Machine Parameters”In the process, I increased the maximum memory to 512 MB and specified the location of the Java 3D DLL using the parameter - Xmx512m - Djava. library. path=lib (the DLL directory can also be set through "Advanced Options">"Local Libraries"). I input the program main class com. eteks. week home3d. week home3D and“parameter”Enter in the text field-openBecause Sweet Home 3D expects this selector before passing any files as parameters.
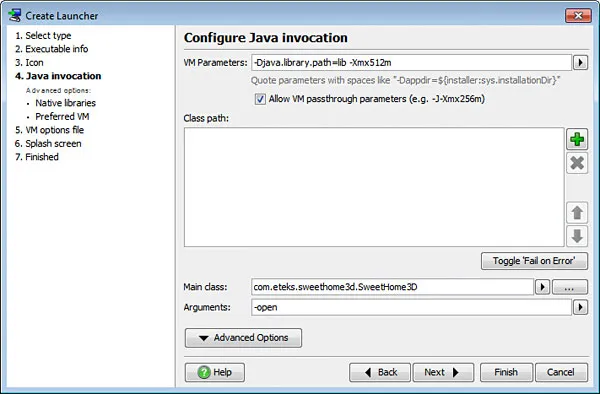
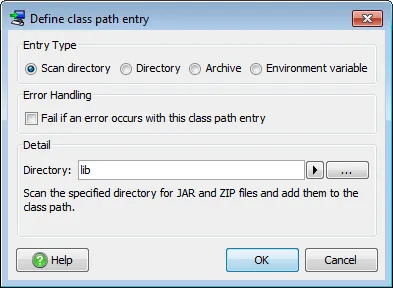
Now, I need to complete it“CLASSPATH”List, which accepts individual jar files, directories containing jar files, directories containing. class files or resources, and information from environment variables. Since I placed all the jar files in the lib subdirectories, I clickedInsert”Button, select“Scan Catalog "Options and enter the lib directory.
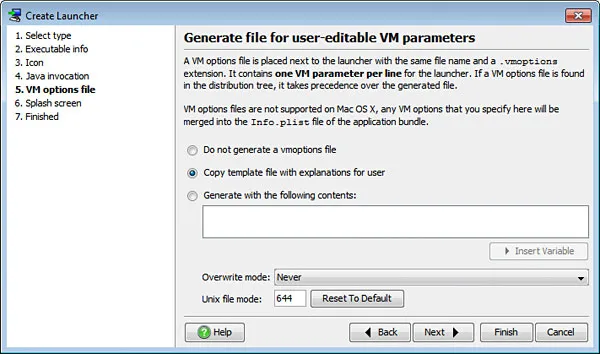
“Virtual Machine Options File”The steps provide end users with an interesting option to change default virtual machine parameters when needed. Due to the use of some system properties and the possibility of requiring more memory to run Sweet Home 3D, I have retained the default settings“Copy template files with user instructions”.
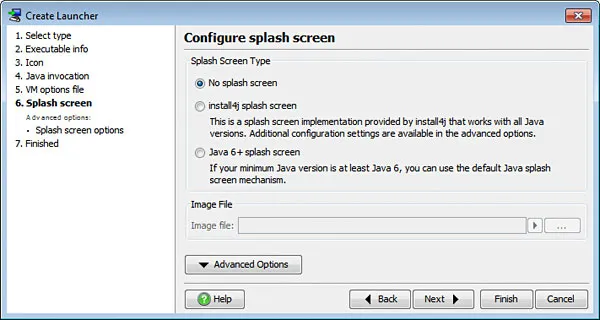
Finally, in“Startup screen”In the steps, I can choose the startup screen image to be displayed when the program starts. Due to Sweet Home 3D handling this feature on its own, I did not change the default settings, but please note that if needed, you can use install4j startup screen or Java 6 startup screen.
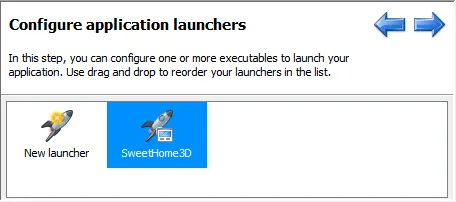
After completing the launcher wizard, a new launcher icon will be added to the launcher screen so that you can change launcher settings in the future.
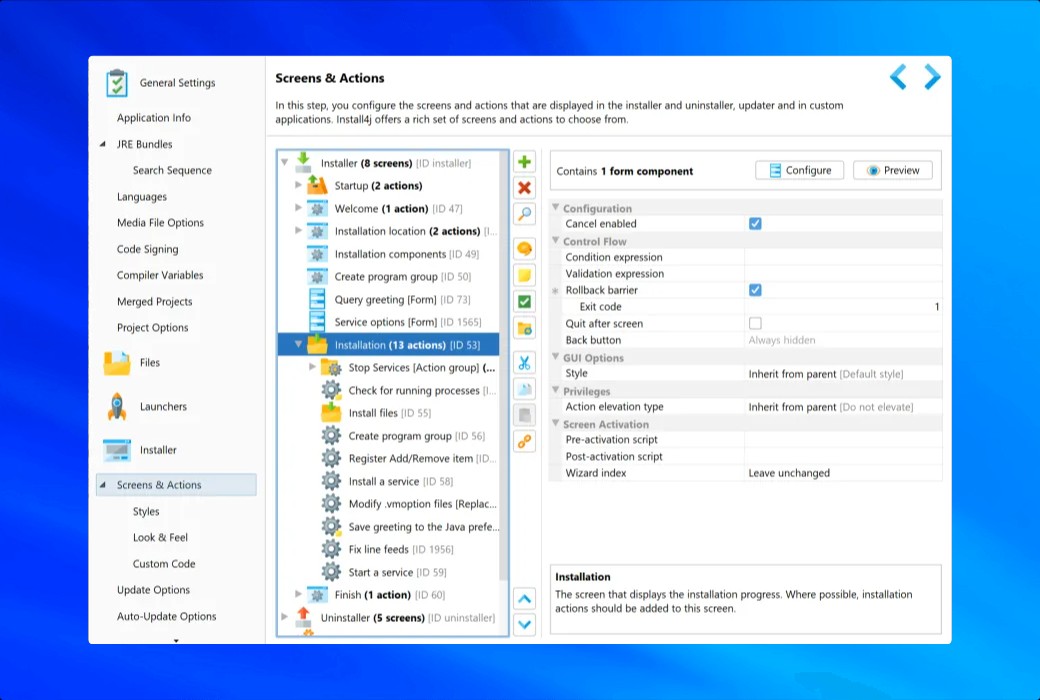
Installer
Installation Program”The screen describes various screens that will be displayed to the end user during program installation and uninstallation. This is a highly configurable tool with many options, and can even be expanded if needed. The screen in the default template will be from“welcome screen”Display to“Complete the screen”.
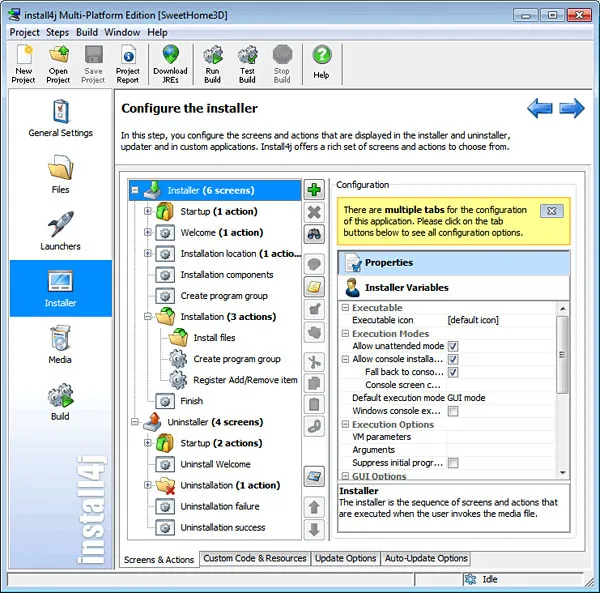
In“Screen and operation”In the tab, these screens are represented by a window icon with gears, sometimes also by custom icons, such as the icon used for "Install Screen". The tree displayed on the left also contains some operations, represented by window icons with gears and custom icons (such as the icon used for "start operation"). The operation is simply one or more statements (which can be pre programmed or custom statements programmed in Java) executed by the installation program during the installation process.
To ensure that the installation program created with install4j performs consistently with the existing installation program, I will add two screens:
I will also add two types of operations:
To add a new screen, I click“insert”Press the button and select from the pop-up menu“add screen”.
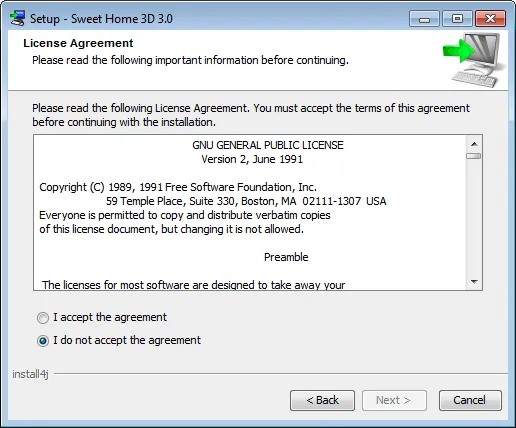
In the displayed“Select installation screen”In the dialog box, I input“license”Use the first letter of a word to filter the displayed list. Once I make a choice“Display License Agreement”I can determine from the description of the project that this screen is likely what I want.
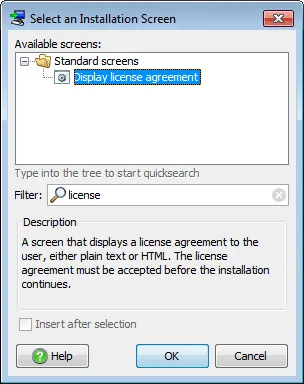
I click“confirm”The new screen will be automatically inserted“welcome screen”Afterwards, it happened to be where I hoped it would appear.
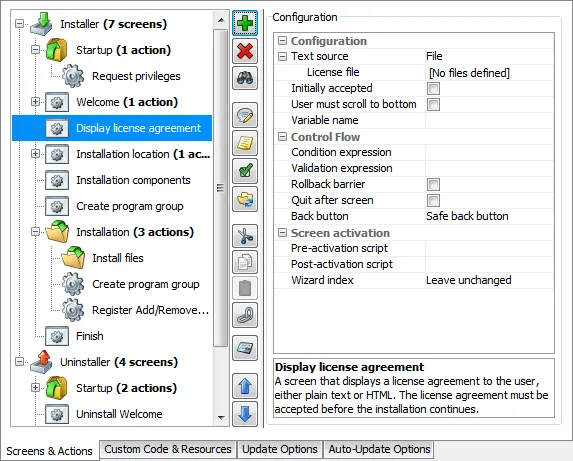
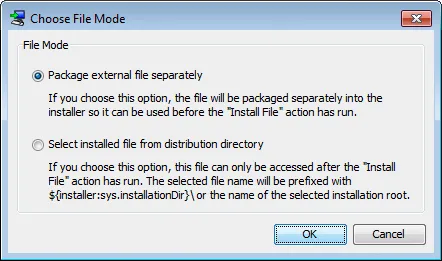
Next, I will enter the missing values in the screen attribute list displayed on the right. I edit“license file”Attribute, install4j allows me to select it as a file packaged with the installation program or as a file from an already installed file.
I choose the first option and select the COPYING.TXT file that contains the GNU GPL license text. Due to the license not being translated into other languages, I have reserved an empty file for other languages, so the default English text will be displayed.
Then, I selected“The user must scroll to the bottom”Option, I hope this will enable more users to read the GNU GPL license.

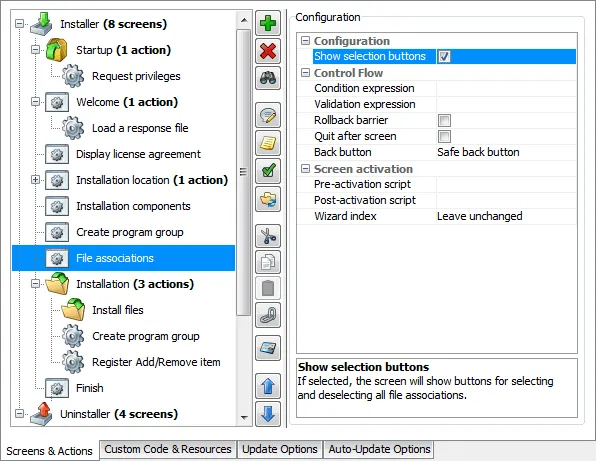
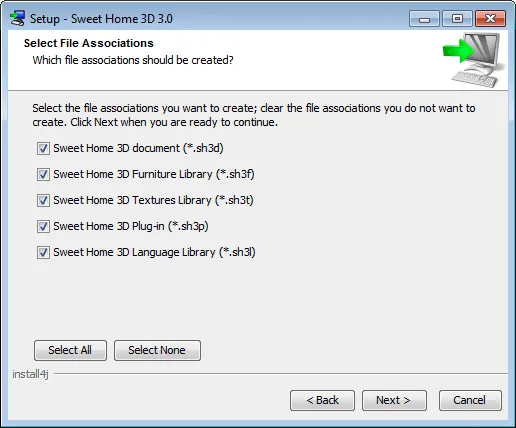
I clicked again“insert”Button, add one“File Association”Screen, select“File Associationproject

After clicking 'OK', install4j prompts that the 'File Association' screen requires one or more 'File Association' operations to work.

I turned off the warning message, added the 'File Association' screen between the 'Create Program Group' and 'Install' screens, and checked the 'Show Selection Button' attribute so that users can quickly select or deselect file associations. Due to the 5 file associations in Sweet Home 3D, these buttons will allow users to select or deselect with a single click.
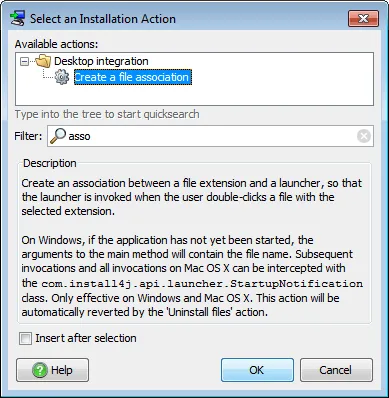
Since file associations should only be performed after the executable files that handle them have been installed, I selected the "Install" screen and then clicked the "Insert" button to add the required actions. In the pop-up "Select Installation Operation" dialog box, I quickly found the "Create File Association" operation by entering the first letter of "Association".
Click“confirm”Afterwards, install4j adds the new operation to“install”On the screen. In the attribute list associated with the operation, I entered the file extension "sh3d", described it as "Sweet Home 3D Document", and selected the SweetHome3D launcher.
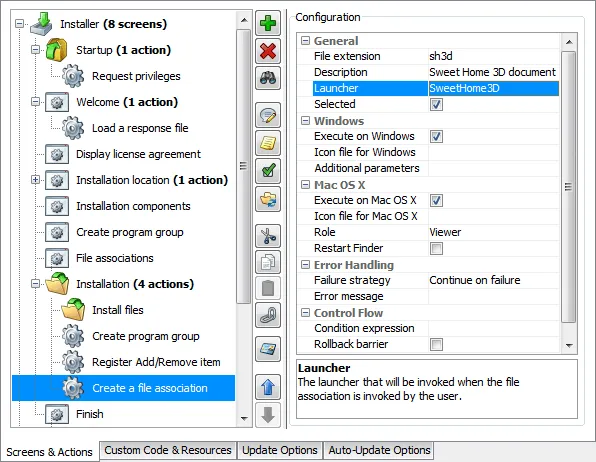
Then, I added file associations with extensions sh3f, sh3t, sh3p, and sh3l in the same way.
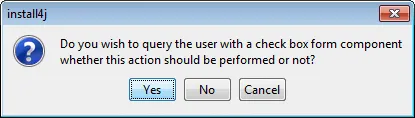
For the operation of launching Sweet Home 3D at the end of the installation process, I select the "Finish" screen, click the "Insert" button, and choose "Add Operation". In the pop-up "Select Installation Operation" dialog box, I filtered the operation list by entering the first letter of "launcher" and selected the "Execute Launcher" operation.
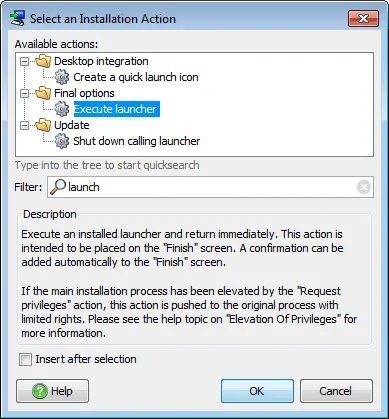
click'Confirm'Later, install4j asked me if I wanted to'Completed'Add a checkbox on the screen so that users can choose whether to launch the program. I accept and ultimately select SweetHome3D as the launcher to run in the attribute list of the 'Execute Launcher' operation.
Finally, I obtained the screen and operation list of the Sweet Home 3D installation program.

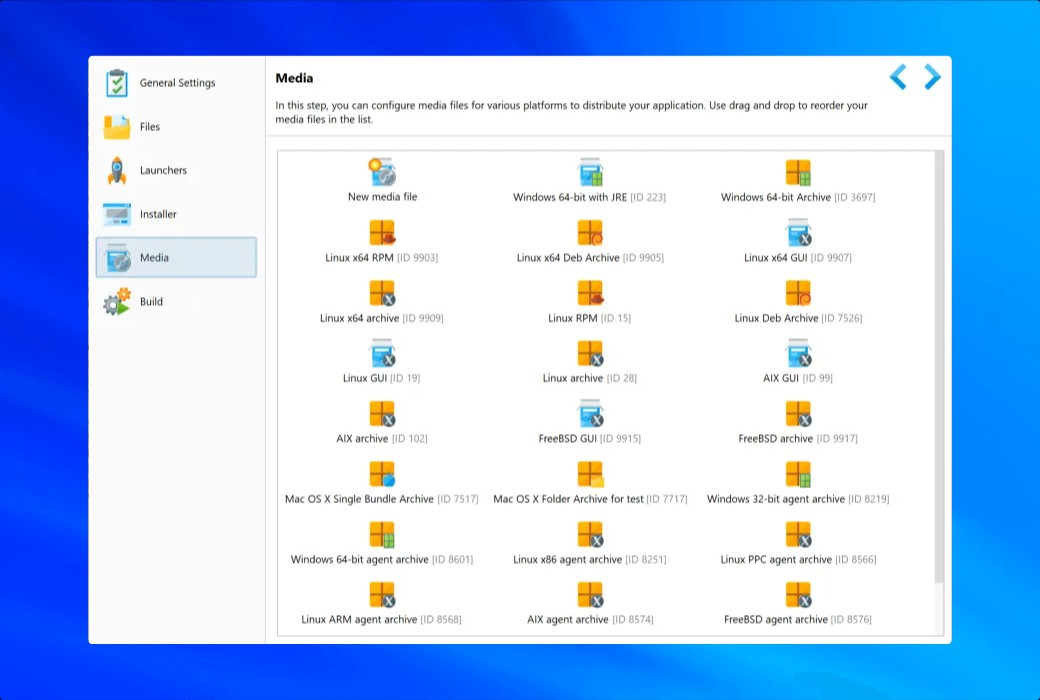
media
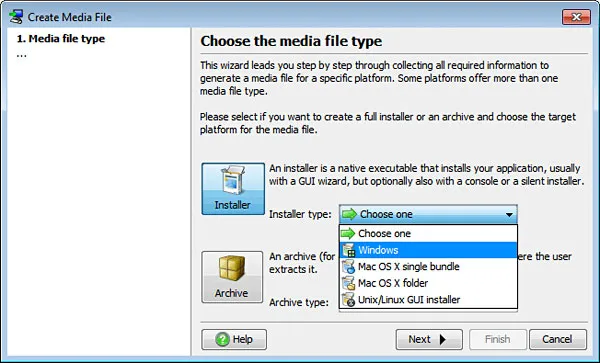
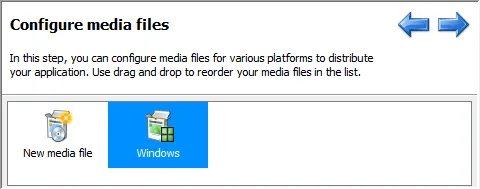
Since I currently do not need to customize code or update features, I will skip directly to the last step and click“media”Icon, then double-click“Create a new media file”Icon.

This will launch a wizard to configure media files. Since I prefer executable installation programs, I am“Installation program type”Windows has been selected from the dropdown menu.
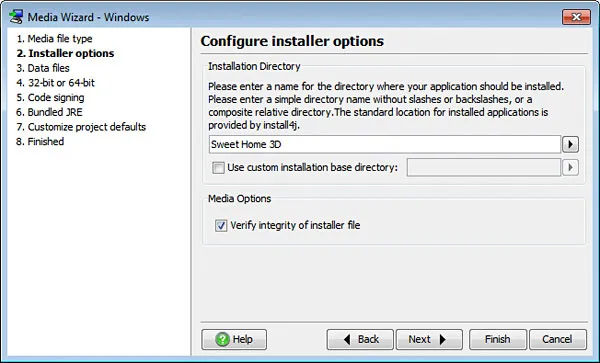
atConfigure installation program options”In the steps, I changed the installation directory to 'Sweet Home 3D'.
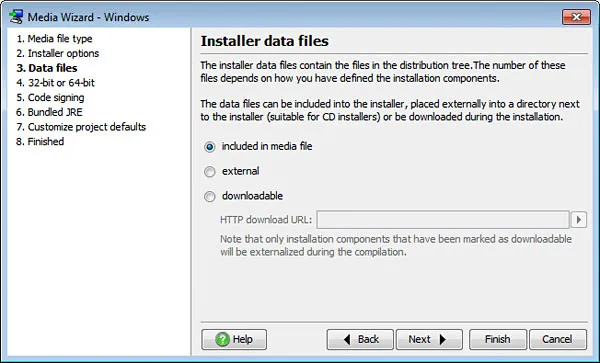
atInstallation program data file”In the steps, I don't need to make any changes because I want to create a single installation program file that contains all the required content.
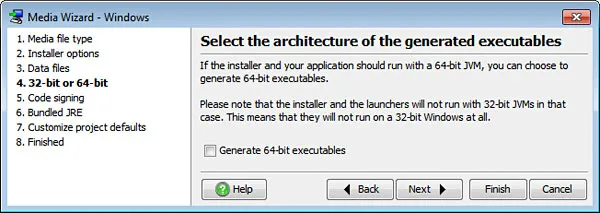
In the step of selecting the architecture of the generated executable file, I did not check the "64 bit executable file" option because the Java 3D DLL provided with Sweet Home 3D is 32-bit.
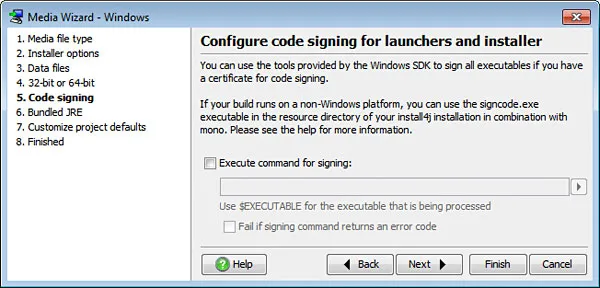
Since I don't have a code signing certificate, I have to skip it“Configure code signing for initiators and installers”Steps.
“Bundle JRE for your application”The steps are more interesting to me.
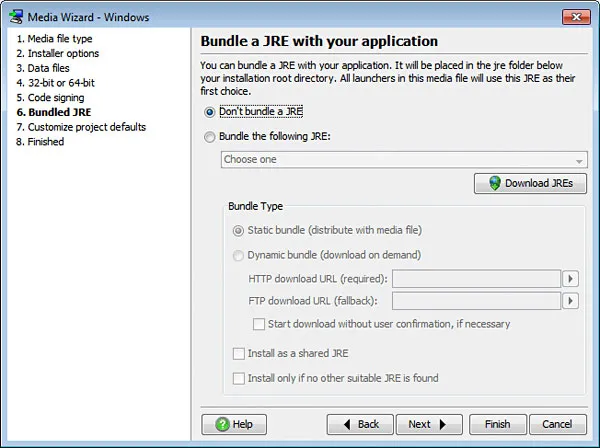
As I wanted to bundle a JRE for Sweet Home 3D to save users the trouble of installing JRE, I chose the 'bundle the following JREs' option and selected the latest JRE after clicking' download JRE '.
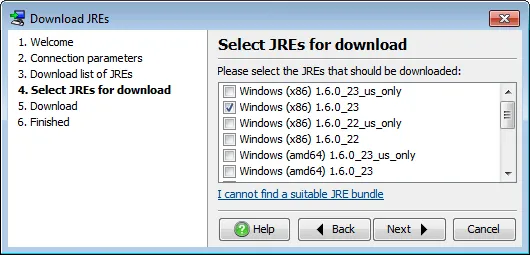
After downloading JRE, I selected it from the "Bind the following JRE" dropdown menu.
I am not interested in the final step of "customizing project default settings". I can directly complete the execution of the media wizard, which will add an icon to the newly created media.
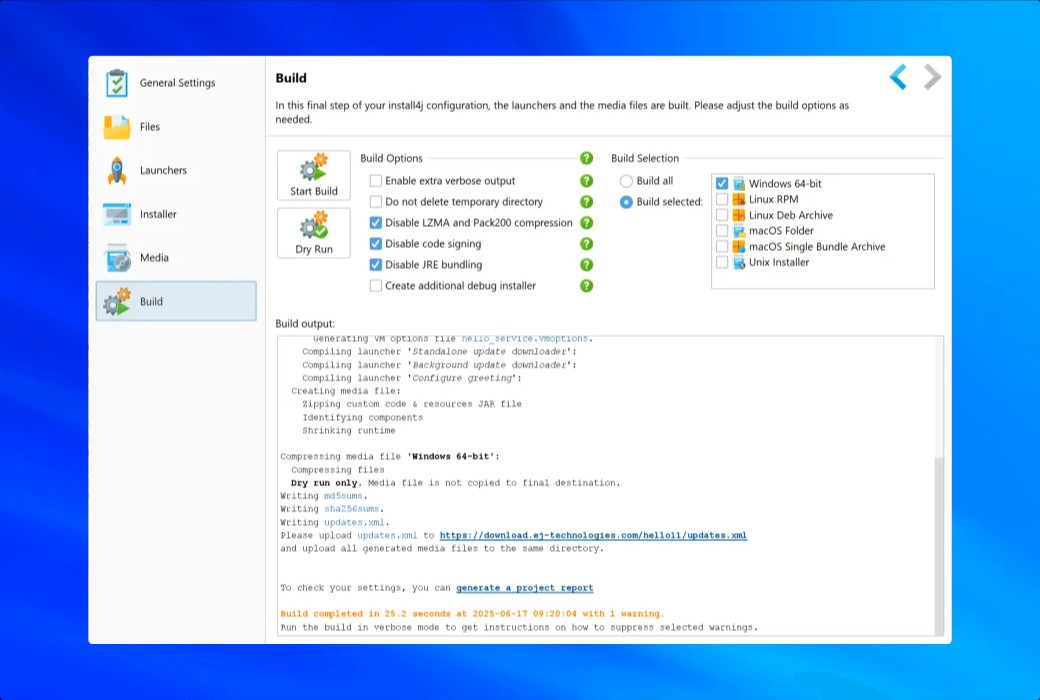
build
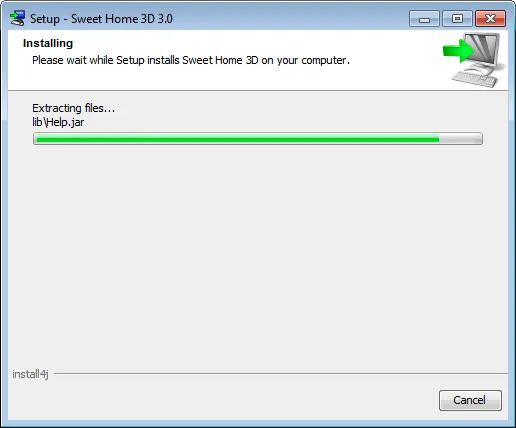
The installation program is now ready to build. I click“build”Icon, then clickStart building "Button.
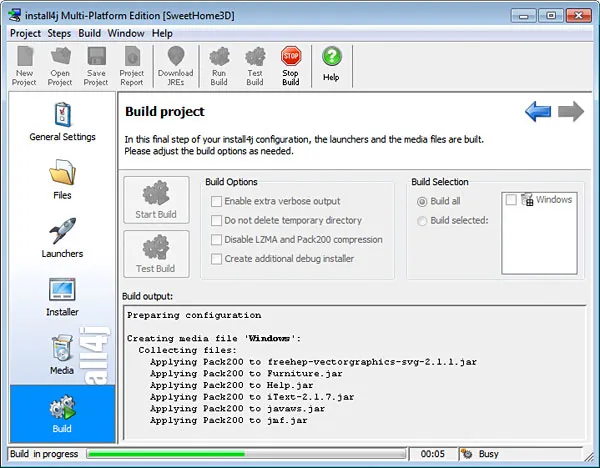
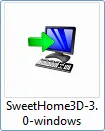
After about 60 seconds, the installation program is generated. My first surprise was that the generated SweetHome3D-3.0-wwindows.exe file was over 4 MB smaller than the file generated by Inno Setup (26 MB compared to 30.6 MB). This may be due to the effect of the Pack200 compression algorithm.
test
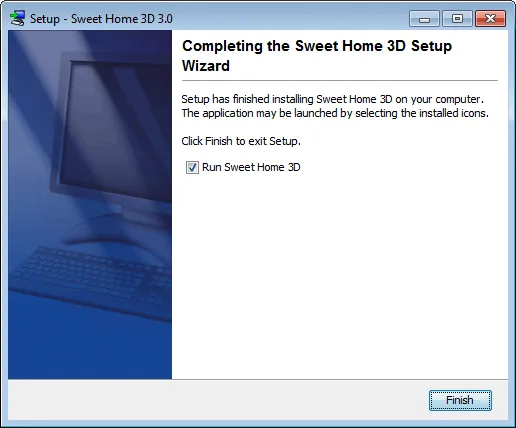
I double clicked the newly generated installation program icon to launch it and received the expected installation screen sequence.
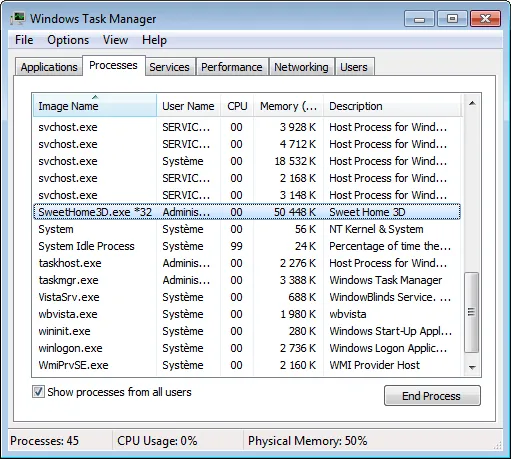
After installation, I launched Sweet Home 3D and checked its display in the "Processes" tab of Windows Task Manager: it showed as SweetHome3D.exe, which is much better than displaying as JavaW.exe.
Conclusion
With install4j, you can easily create installers and launchers for your Java applications. Despite the many steps in the installation wizard, you will feel that install4j is guiding you towards your goals. Actually, install4j provides more features, which I will test in the second article.
I will use install4j to download some optional files for Sweet Home 3D and configure some program parameters, such as memory settings, system properties, and default preference files.
I will also demonstrate how to use different installation modes and how to automatically update the program.